The Quilted Huppa
 |
| Why a quilted huppa? It can be far more
beautiful, personal, and meaningful than a large piece of tulle, or a rented
huppa or tallit. It can
incorporate family heirloom textiles, like neckties, baby
clothing, worn tallit, etc. It can include words and art from
family and friends. And, thanks to the wide variety of
novelty fabrics and improved photo-transfer techniques, it can
include themes and details to make it truly unique to the couple.
I always interview bride, groom, and if possible, family and friends,
before making a huppa.
My article about quilted huppot
will appear in the July/August 2003 issue of Quilters Newsletter
Magazine. The article includes a couple more of my own huppot, plus some
seriously astonishing huppot made by well known and/or
incredibly talented and not necessarily Jewish quilters including Paula Nadelstern, Sarah Nephew and Ricky
Tims Below, you will find information that's NOT in the
article, about how to erect a quilted chuppah at a real live wedding.
|
|
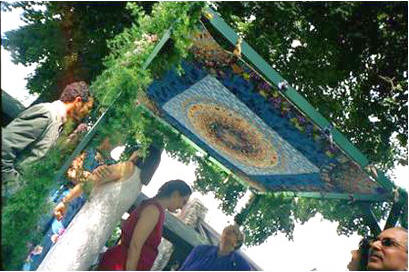
(Above). My 'Sushi' huppa at the wedding---view from the back and
underside.(The florist didn't decorate the back horizontal piece). You
can see the ties holding to the unadorned back top of the frame. A
picture of this quilt, along with two more huppot that I made, appears
in the July/August issue of Quilters Newsletter Magazine. Personal
imagery on 'this huppa included photos of the couple's cats, and
their favorite birdfeeder, along with favorite foods and more. (By the way, I cut out all the
non-kosher sushi before strip piecing this quilt!) . |
|
| |
|
|
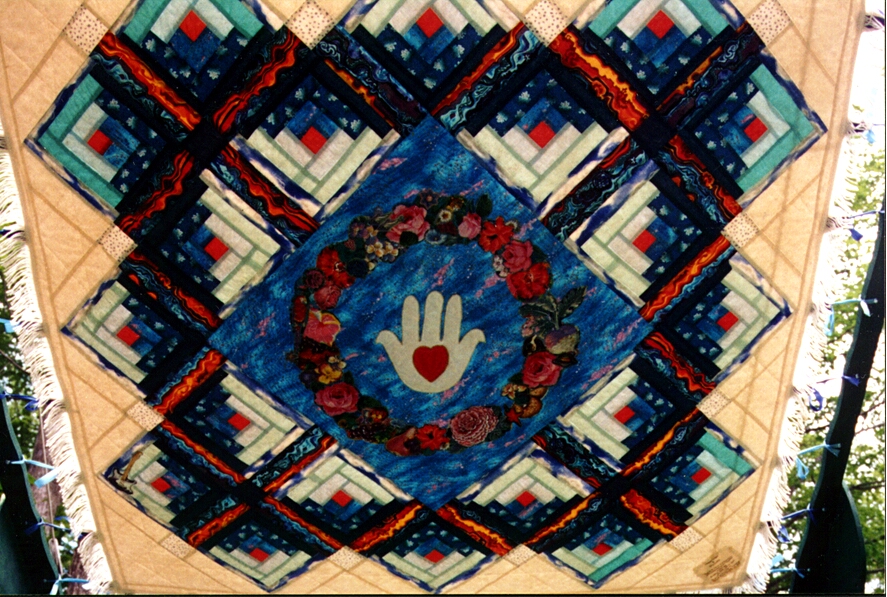
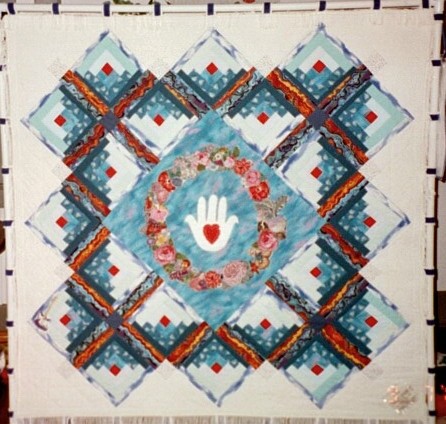
| (Above) 'Fire and Ice'
Huppah, 1997. This huppa was made for a pair of devoted skiiers.
Hiding among the snowy 'log cabin' blocks and foliage are images
like electric guitars, bagels, olives, dolphins,etc . A photo-transfer
of their wedding invitation is in the lower right corner, embellished with
pearl buttons. I owe the central heart-in-hand design
to the best (and so far, only) book on Judaic quilting: The New Work Of
Hands by Mae Rockland Tupa (See 'Resources').
Light shining through a colorful huppa looks like stained glass!
|
| |
|
HANGING HUPPA HOW-TO'S
SOMETHING has to hold your huppah in
the air. Conveniently located trees, and wires hung from the ceiling, are
approaches that quilters have described to me. But in most wedding locations, neither of these
is an option. So here are some more likely ideas:
1. If you have four strong, brave, fit
huppa holders, and a smallish quilted huppa, the only support system you
will need is four poles--closet rods available at the home improvement
center will work (At my home improvement center, they're 8' long and cost
$8 each.). Strong, thick, bamboo poles; thick tree branches (or thin tree
trunks), and even PVC poles (over 1" thick) can work too. While
half-poles have traditionally used, they're awfully tough on your huppa-holders' arms. It's
more considerate to make them long enough to rest on the ground.
Cut to about 7' tall, or more if your huppah has an overhang.
You can drill holes sideways through the top of the poles, and use wire
to secure the huppah. An eyehook sunk deep into a strong wooden pole would
work, too.
Paint, decorate, and/or
disguise the poles any way you like. Paint them green (there are new
types of paint that cover plastic, if your poles are PVC). Cover them with vines (real
or artificial), punctuated with flowers. Or make scrunchy fabric sleeves to
cover them, or wrap ribbon around them.
2. If you have four not- so-fit huppah
holders, or you just want to minimize the stress on their arms, it's a better idea to
plant the base of the poles for extra support. Plant them in:
-
Deep baskets or flower pots, filled with sand,
sand bags, gravel, or rocks. (Flowers on top will disguise the contents);
-
Plastic outdoor umbrella bases (available at the home
improvement center, they're filled with water or sand to stabilize, though
you may also need to wrap the bottom of your poles in some duct tape, or
towels, so they'll be gripped firmly in the poles). They cost about
$10 each.
-
Heavy decorative cast iron outdoor umbrella stands
(high quality ones have an adjustable screw to hold the pole securely,
regardless of pole diameter.) These run about $25 each, more or less.
-
Christmas tree stands. I kid you not. These work for
many diameters..
In all of these cases, your huppa-holders would serve
as extra insurance that the poles don't fall over and smash the cup before
the groom gets to it. (Smash the groom before the bride....oh, never mind).
Any of the four-poled systems described above will
also require some extras on your quilt. Here are some possibilities:
-
Buttonholes or Grommets. You can sew a buttonhole in
the corners of your quilts, through all the layers Ribbon or wire can then
be strung through the holes to the support the quilt. Grommets---thick
metal rings--- are hammered into holes in the fabric (you can find a
grommet kit in your fabric store) Wire or ribbon is slipped through the
grommet, and around or through the top of the pole. Downsides These
options can stretch the corners of your quilt, and some people don't want
holes in their quilt.
-
Fabric ties. My preference, to hold a huppah
to four poles, or an entire frame. I sew them on with a zig-zag stitch,
just past the binding, and remove them with a seam ripper after the
wedding. If you're using poles, you only
need ties at the four corners. If you have a frame that circles the
circumference of the huppah (see below), put ties at regular
intervals on the quilt (see the first picture at the top of this page---it
shows the ties every foot or so). Make the ties from strong fabric or
ribbon. A 24" strip folded in half makes two 12" ties.
Machine stitch through the center .
|
| |
|
THE FRAME GAME
If
you have no huppa holders, or your huppa holders are challenged in the
upper body strength department---or, if or you have a large quilted
huppah (over 45" would be my estimate), go for a free-standing frame.
Along with four poles vertically holding the
corners, a horizontal support all the way around the top circumference, will prevent
the quilt from sagging.
|
 |
|
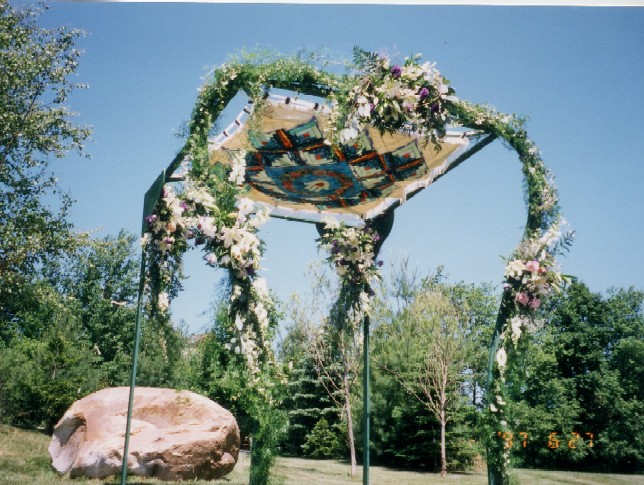
A
friend who was a professional carpenter built this elegantly
curved frame for the 'Fire and Ice' huppa.
|
|
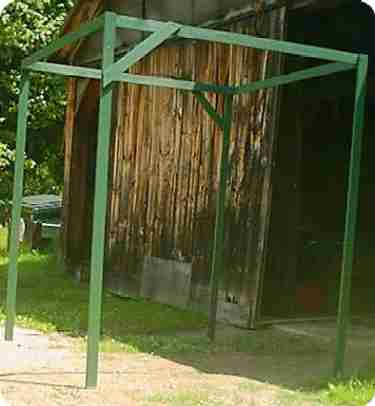
| A friend who describes his carpentry skills
as "basic," built the subtle knock-down frame above for the Sushi huppa. He
brought it to the wedding disassembled, and we erected it on the spot,
using an electric screwdriver. It held the huppa strong and steady during a
very windy ceremony. He painted it flat green, so it virtually
disappeared behind the floral decorations. It's this frame that's in the
first picture at the top of the page. |
|
 |
|
| |
|
Before you whip out the power tools, call your florist and ask if they have
a huppa frame. You may be surprised. Jewish bookstores and supply stores
often rent them, as well. Find out the dimensions, and whether they'll work
with your quilt.
If you have no florist, or no Jewish supply store, or your florist never
heard of a huppa (also try the words "wedding arch" and "wedding
canopy,"), you can make a huppa frame yourself, if you or someone you trust
has carpentry skills.
Finally, if you don't have a strong huppa
holder, you cannot build a frame, or your huppa quilt isn't done in time,
there's another option: Use an unfinished single-layer top of a quilt as a
huppah. You can baste a temporary backing to it, if the back is messy. It
will be light enough to be held up by thin poles held by non-iron-pumping
friends or family. Then, finish it as a quilt later, after the wedding. (The
permanent backing can be set out on a table for guiests to sign at the
party---see 'Group Projects').
|
| |
| CHUPPAH IN A CHURRY: The wedding is in a month---you are determined to make a huppa ---you
have a job, a family, and also like to sleep. What should you do?
* Take an lovely old family quilt, tablecloth, etc., get four poles
(as described above), sew ribbons to the corners,
and use it as a huppa. If you don't have a lovely old family textile, go to
a fabric store or an antique or thrift shop and acquire one from someone
else's lovely old family. If you yourself are the actual bride,
or her mother,
this--or borrowing or renting someone else's finished huppa--- using a
ready-made huppa (whether it is a tallis or a tablecloth) are the ONLY options you
should consider. You've got better things to worry about than finishing a
quilt in a month. Later, when the
wedding is over, you can figure out ways to turn that textile into an
heirloom quilt.
* If you are NOT the bride or her mother, and don't have a zillion other things to do for this wedding, you can think about completing a huppa in time. Proceed directly to
the Six Pointed Stars page here. If you have just a
little quilting experience (and a sewing machine, a rotary cutter and
mat), order Mace McElligot's Magic Star 6 template, mirror, and instruction
book. You will be able to pound out a simple star littered quilt top in about a week (assuming
a day job, and some sleep). And you'll have a great time doing it. You
don't have to put backing or batting on this quilt before the wedding, as
long as the top is done. The lighter weight also means you won't have to worry about building a strong frame.
Poles held by moderately strong friends will keep it aloft.
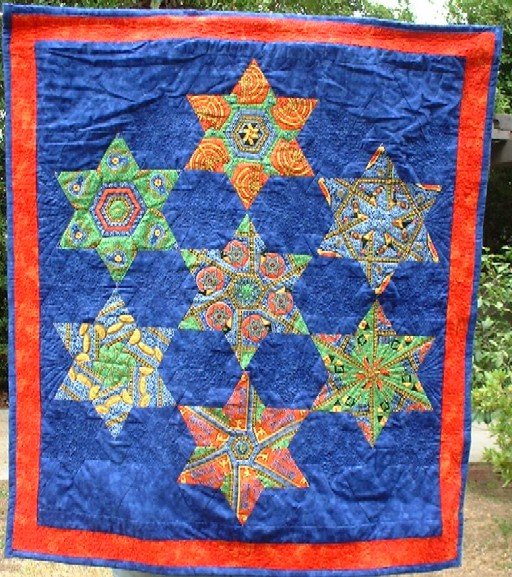
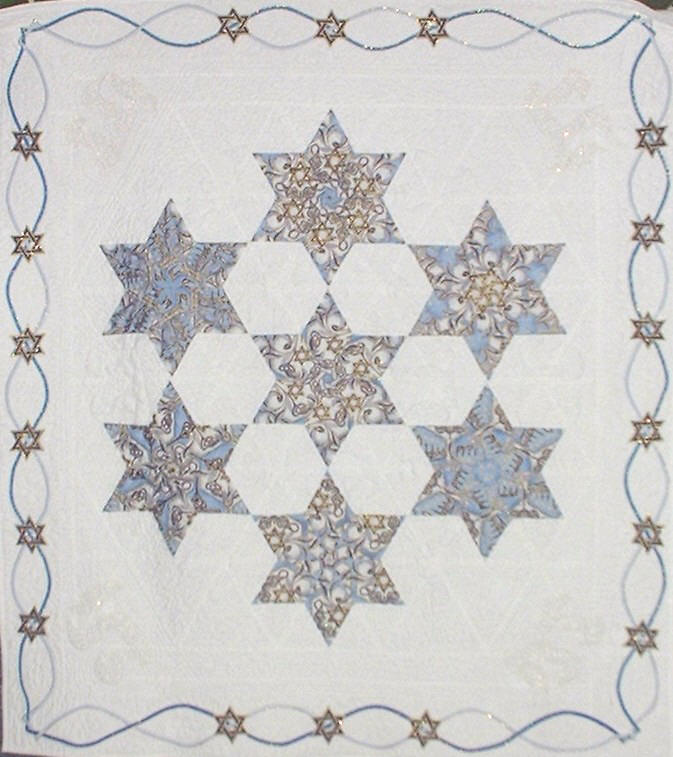
* If you have a little more quilting experience or chutzpah, you own the tools (rotary cutter, ruler and mat), and want a six-pointed star design , you can follow the book, Magical Stack and Whack Quilts
by Bethany Reynolds widely available in quilt shops and bookstores. That's how
Sue Feinberg made her wonderful
Chanuka wallhanging. I made the
'Chuppah in a Churry' in the July/August
QNM using this system, too. .
* If you're better at drawing than sewing, consider an applique quilt. Applique means cutting things out and sewing them down. You can design a simple Tree of Life; a free-form six pointed star, etc. Select a background fabric (about two yards at least), plus fabric for the colors you'll want in the foreground . Buy a couple of yards of Wonder Under or some other brand of medium-weight paper-backed fusible web at the fabric store. Following directions, iron the webbing onto the back of any colorful fabric
you like. Cut your shapes, and iron to your backing fabric (following the
ironing directions on the fusible web insert). Zigzag or stitch around the edges of each shape. Finish the edges of your quilt top,
add loops, and voila, your huppa is done, just in time for the ceremony. You can add a permanent batting or backing later, if you like, or just leave it as a banner-like wall hanging
.
|
| |
| Questions? Comments? Gotta great huppa that I can show here? Please email me at
AJWCJP@aol.com. |
|